GSW ConnectBot Android Client for SSH/Telnet
 |
Users Guide

GSW ConnectBot Android Client for SSH/Telnet
|
Users Guide
THIS PAGE INTENTIONALLY LEFT BLANK
Georgia SoftWorks
Public Square
17 Hwy 9 South, PO Box 729
Dawsonville Georgia 30534
Telephone +1 706.265.1018 * Fax +1 706.265.1020
Visit Georgia SoftWorks web site
Copyright © Georgia SoftWorks, 2018 All Rights Reserved.
Google, Android, Google Play, ConnectBot, are trademarks of their respective companies.
THIS PROGRAM IS PROVIDED "AS IS" WITHOUT WARRANTY OF ANY KIND, EITHER EXPRESSED OR IMPLIED, INCLUDING, BUT NOT LIMITED TO THE IMPLIED WARRANTIES OF MERCHANTABILITY AND FITNESS FOR A PARTICULAR PURPOSE.
LICENSOR MAKES NO WARRANTIES OR REPRESENTATIONS, EXPRESS OR IMPLIED, ORAL OR WRITTEN, REGARDING THE PROGRAM OR DOCUMENTATION AND HEREBY EXPRESSLY DISCLAIMS ALL OTHER EXPRESS OR IMPLIED WARRANTIES, INCLUDING MERCHANTABILITY AND FITNESS FOR A PARTICULAR PURPOSE. LICENSOR DOES NOT WARRANT THE PROGRAM WILL MEET YOUR REQUIREMENTS OR THAT ITS OPERATION WILL BE UNINTERRUPTED OR ERROR FREE.
IN NO EVENT WILL GEORGIA SOFTWORKS BE LIABLE TO YOU FOR ANY DAMAGES, INCLUDING ANY LOST PROFITS, LOST SAVINGS OR OTHER INCIDENTAL OR CONSEQUENTIAL DAMAGES ARISING OUT OF THE USE OR INABILITY TO USE SUCH PROGRAMS.
LICENSE:
YOU ARE LICENSED FOR AN INSTANCE OF THE GSW CONNECTBOT CLIENT SOFTWARE ON A SINGLE SPECIFIC DEVICE. ANY ATTEMPT TO DUPLICATE THE LICENSE IS IN VIOLATION OF THIS AGREEMENT. THE GSW CONNECTBOT SOFTWARE MAY BE INSTALLED ON A SINGLE ANDROID DEVICE.
Table of Contents
Enable Application for Execution
Activating a protected product using a GSW provided Serial Number
Activating a protected product using the GSW License Server
Registering the Georgia Softworks License Server
Activating a protected product using the GSW License Server and a license pool
Create new Host Connection Configuration
Using Answerback with the GSW SSH/Telnet Server
Answerback Example Configuration
Lockdown (Pinning the app) on Android 7.0
Lockdown (Pinning the app) on Android 6.0
Configure a Host Connection Example 1
SSH with Password Authentication
Save host connection configuraiton
Connect to the new configured connection
Configure a Host Connection Example 2
SSH with Public/Private Key Authentication
Using a Public/Private key pair
Configuring the Host (Public) key on a GSW UTS SSH Server
Configure a Telnet Host Connection
Save host connection configuraiton
Connect to the new configured connection
Table of Figures
Figure 1: Android device listed in Windows Explorer
Figure 2: Enable Unknown sources
Figure 5: Installation progress bar
Figure 7: Admin and Work Modes
Figure 10: Manual Serial Number
Figure 11: Locate serial.g2c file
Figure 12: Apply Serial Number
Figure 13: Browse to serial.g2c
Figure 15: License Server Executable
Figure 21: Register Using GSW License Server
Figure 22: Auto Locate GSW License Server
Figure 24: Configuring a Host connection
Figure 25: Host Connection Screen Display
Figure 26: Menu to access Global configuration
Figure 32: Two Modes of Connection
Figure 34: Settings Icon on Home Screen
Figure 35: Tap Lock screen and security
Figure 36: Other Security Settings
Figure 38: Enable Ask for PIN before unpinning
Figure 39: Pinning/Unpinning an App, 7.0
Figure 43: Lock Screen Security
Figure 44: Pinning/Unpinning an App 6.0
Figure 48: Tap text field and soft keyboard opens
Figure 49: Enter username, nickname, etc.
Figure 50: Saving the Connection
Figure 51: Host screen for Key generation
Figure 52: Manage Pubkeys menu item
Figure 53: Create SSH Key Pair
Figure 54: Generate Randomness for Keys
Figure 55: Generate Randomness until 100%
Figure 56: Unlocking a Key Pair
Figure 58: Certificate Mapping Tool
Figure 59: Installing Public Key
Figure 61: Restart SSH Service
Figure 63: Defining a Telnet Host
Figure 64: Enter Username, Nickname, etc.
Figure 65: Connection Settings
Thank you for purchasing the GSW ConnectBot.
GSW ConnectBot is a simple to use but a powerful Secure Shell (SSH) client for Android. GSW ConnectBot is a feature rich client that both system administrators and users will appreciate. It is well suited to the demands of industrial environments.
GSW ConnectBot is the most cryptographically secure, commercially supported SSH client for Android available.
The GSW ConnectBot is a standard Android Packet Kit (APK). Simply copy the APK to the device and execute. Once installed, configure the connections with the features desired. Please keep in mind that device settings may vary between Manufacturers and Android versions. GSW ConnectBot has been tested on multiple devices, and Android versions 4.4.2 through 7.0.
Following are instructions on how to install GSW ConnectBot on your device. Installation is a simple process. To summarize:
· Enable Application to be executed
· Copy APK to Device
· Run APK installation
In this example, we will be using a USB connection.
To begin, connect your device to your workstation via a USB cable. The device should appear in the Windows Explorer navigation pane.
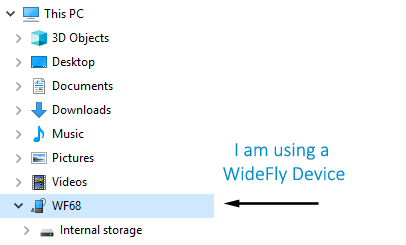
Figure 1: Android device listed in Windows Explorer
Make sure that “Unknown Sources” is turned ON under “Security” menu in “Settings”. This allows applications to be installed from outside the Google Play Store. The name of the “Security” menu may vary from device to device.
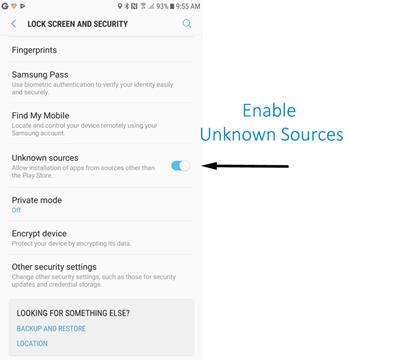
Figure 2: Enable Unknown sources
Copy the GSW ConnectBot APK to the device using Windows Explorer, download or by whatever method you choose, preferably to the “Download” folder, as some device File Managers limit access to files at the root of storage. The name of the actual GSW ConnectBot APK is gsw_connectbot.apk. The example below shows a different filename.
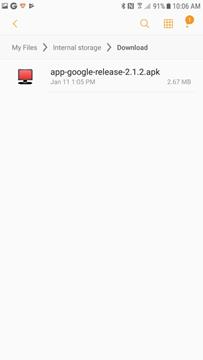
Figure 3: APK on device
Tap the GSW ConnectBot APK shown in Figure 3, and the following is displayed:
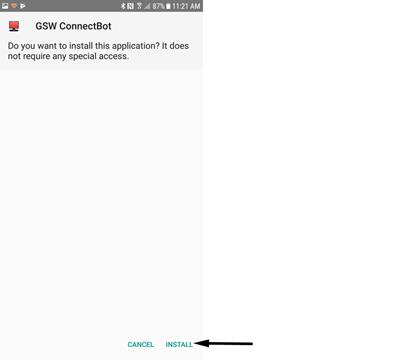
Figure 4: Install screen
Next, tap the “INSTALL” button as shown above.
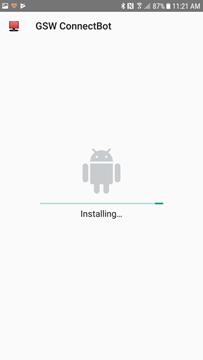
Installation continues and completes.
|
Figure 5: Installation progress bar
|
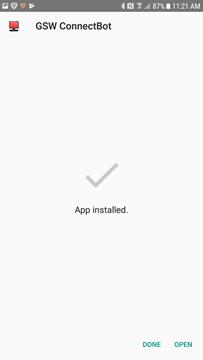
Figure 6: Install complete |
If you tap “DONE” in Figure 6, you will need to manually launch GSW ConnectBot in Administration mode to begin configuration. Tap “OPEN” to immediately begin configuration of GSW ConnectBot. The App will open into License mode by default, as described in the next section.
Use the icon without the “W” for configuration and administration. The icon with the “W” is a restricted, lockable version for end users.
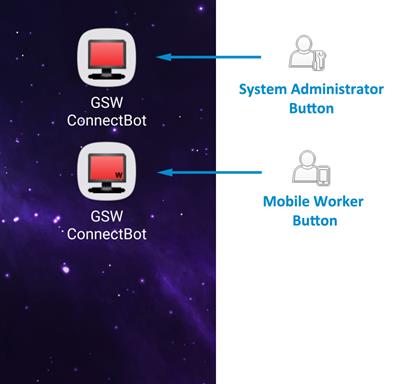
Figure 7: Admin and Work Modes
The GSW ConnectBot administration mode can license GSW ConnectBot, create and use connections. The Worker icon is for launching preconfigured connections created by the System Administrator. The end user can also be limited to running only GSW ConnectBot, using a process call “App Pinning”, which we will discuss later in this manual.
1. When the protected application is installed and launched, you will be taken to a Licensing dialog screen. Select the “Serial Number” radio button. Tap “Continue”. You can also check your current licensing status by selecting the “Check License Info” radio button and tapping “Continue”. A new install of GSW ConnectBot has a full featured 30 day trial period, after which the App will need to be licensed to function.
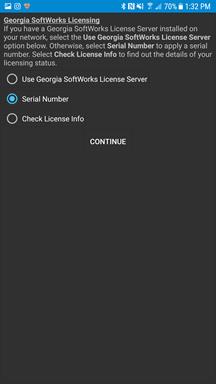
Figure 8: Manual Activation
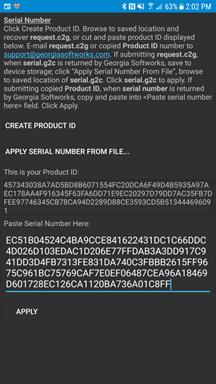
2. On the following screen, press the “Create Product ID” button. The software will generate a “request.c2g” file and place it at the root of main storage. Recover this file and send it to registration@georgiasoftworks.com. You may need to move the file from the root of main storage to another folder to be able to recover it via USB for e-mailing from your PC.
3. You may also copy and paste the Product ID from this screen and e-mail it to GSW. Hold and press your finger on the Product ID, a Copy/Paste dialog will appear. Tap “Copy” to send the product ID to the Android clipboard, and then paste it into an e-mail to GSW. When GSW returns the manual serial number, use the same process to copy and paste it into the <Paste serial number here> field and tap apply.
|
Figure 9: Create Product ID
|
Figure 10: Manual Serial Number |
4. If using the .c2g/.g2c process, when you receive the “serial.g2c” file from Georgia Softworks, use a USB connection to copy to the “Downloads” folder on your device.
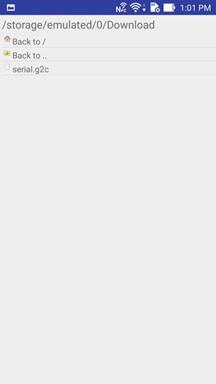
Figure 11: Locate serial.g2c file
5. Click on the “Apply Serial Number from File” button in the application.
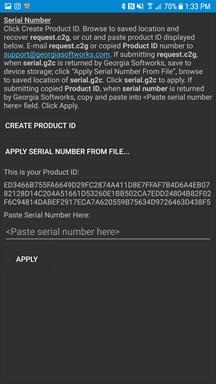
Figure 12: Apply Serial Number
6. Browse to the “Downloads” folder on the device where you saved the “serial.g2c” file and select it.

Figure 13: Browse to serial.g2c
7. When the “serial.g2c” is applied, you will see the following:
Click OK to launch your licensed application.
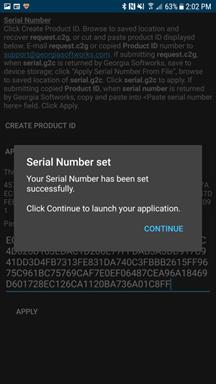
Figure 14: Serial Number Set
Installing the Georgia SoftWorks License Server.
1. Download the Georgia SoftWorks License Server executable. The License Server can be installed on any modern Windows OS. The License Server must reside on the same LAN as the device being licensed. Once licensed, the device is portable to other networks.
![]()
Figure 15: License Server Executable
2. Double click the executable. You will see the initial setup dialog. Let it run until finished.
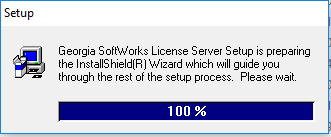
Figure 16: Setup
3. Select “Next” on the following dialogs, click finish when complete.
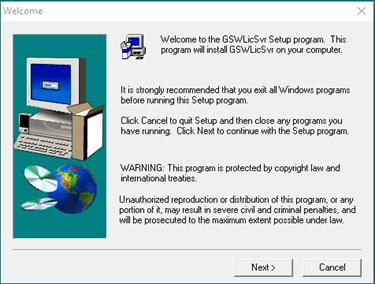
Figure 17: Welcome
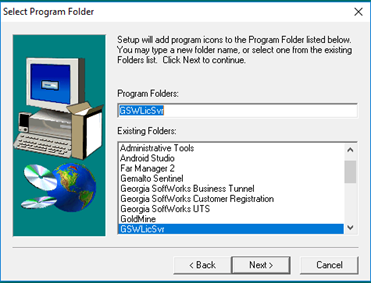
Figure 18: Install Location

Figure 19: Setup Complete
1. From the Start Menu, select GSWLicSvr, Registration.
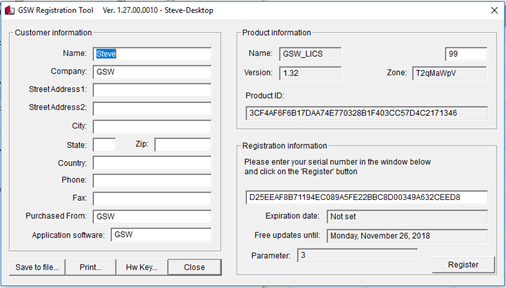
Figure 20: Registration Tool
2. Fill out Customer information and click “Save to file…”.
3. Send this file to Georgia SoftWorks. For fastest response, use the GSW Support Ticket System. Open a registration support ticket and attach the Register.txt and state the number of requested activations. If you are unable to access the GSW Ticket System, you can send the register.txt to registration@georgiasoftworks.com with the number of requested activations.
4. Enter the Serial Number returned and click “Register”.
5. Your License server will now dispense licenses for software, up to the number of requested activations.
1. When the protected application (.APK) is installed and launched, you will be taken to a Licensing dialog screen. Select “Use Georgia SoftWorks License Server” radio button and press “Continue”.
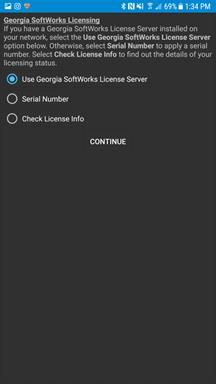
Figure 21: Register Using GSW License Server
2. On the following screen, click the “Find GSW License Server” button. The IP address and Port number should self-populate. If it does not, you can manually enter the IP address of the licensing server and use port 12574.
3. Click the “Get License” button. If there is a license available for distribution, the application will be licensed and the pool of available licenses will decrease by one. You may also use the “Release License” button to unregister the device and return the license to the pool to be used again.
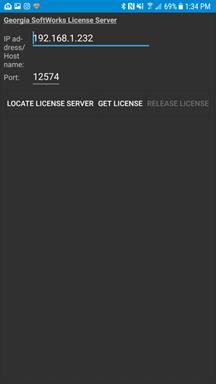
Figure 22: Auto Locate GSW License Server
The Hosts screen lists all the configured connections. When using System Admin icon you can add, delete, and modify configurations as well as initiate a connection. Unless noted otherwise, configuration description is by the System Administrator.
Multiple connections can be defined, each with a nickname and color-coded text for easy identification.
Additionally you can have multiple connections running simultaneously and navigate back and forth between them by horizontal swiping and by the selection of tabs.
Open GSW ConnectBot App on your Android device.

Figure 23: Creating a Host
Tap the plus sign button in the lower right corner to start a new host configuration.
The following screen is displayed:
|
Figure 24: Configuring a Host connection |
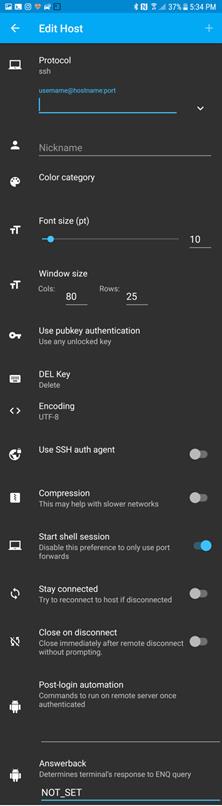
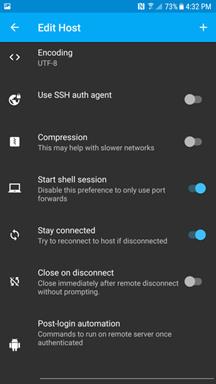
Configuration Parameter and defaults are emboldened. SAVE – Tap the plus sign to save the configuration Protocol: Options are ssh , telnet and local. Local gives access to the local Linux shell. This is the username and hostname/ip address of the ssh host. Entered in the format <username>@<hostname> Nickname: Nickname: Easy name to associate with the username/hostname on the ssh host. This is displayed on the Hosts screen Color category: Color category: This is the color for the text displayed in the Hosts screen. Font size (pt.): Font size does not need to be set unless the columns and rows of the Window size are set to zero
Window size: Adjust window size to match your server’s settings. Default 80 Cols 25 Rows. Use pubkey authentication: Options are: “Use any unlocked key”, “Do not use keys” and select one of the available public keys
DEL Key: Options: Delete or Backspace Encoding: Options: UTF8
Use SSH auth agent:
Compression: Options: enabled / disabled. May help with slower networks.
Start Shell Session: Default: enabled / disabled. Disable to only use port forwards.
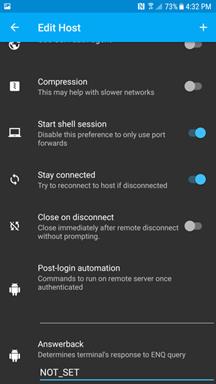
Stay connected: Options: enabled / disabled. Try to reconnect to the host if disconnected. Close on disconnect: Options: enabled / disabled. Close immediately after a remote disconnect without prompting. Post-login automation: Commands to run on remote server once authenticated.
AnswerBack: Enter an Answerback if needed by your application.
|
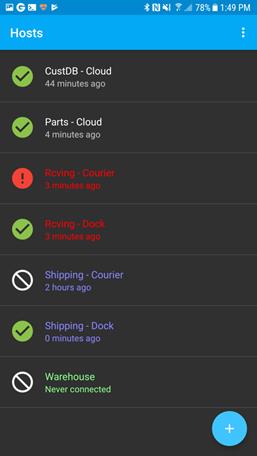
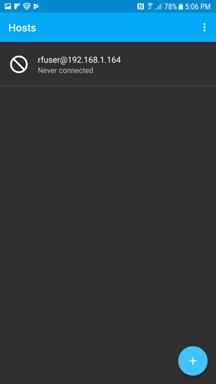
Host Connections are displayed on the Hosts screen.
Each connection has a status Icon, the Nickname and connection duration.
|
Figure 25: Host Connection Screen Display
|
|
Please notice the icons, the color of the text for each host connection and the nicknames. Each connection is customizable so that you can quickly recognize the connection by the nickname, the text color and the status.
|
Icon |
Status Description |
|
|
Connected |
|
|
Non-Connected |
|
|
Abnormal Disconnect |
The time the connection has been in that status is displayed under the nickname.
From this screen, you can perform a variety of operations on the connections.
Tap a host to initiate the connection
To access to the Host Connection menu, use a “Long Press” (Touch and Hold) on the specific Host connection. The result of the Long Press is a menu is displayed with the following options.
· Disconnect
· Edit Host
· Edit port forward,
· Delete host
Tap to Disconnect from the host
Tap to modify the Host Connection settings. You save the changes by Tapping Save Host, in the upper right hand of the screen.
This allows editing of the Host Connection Port Forward settings.
Tap to delete the Host Connection.
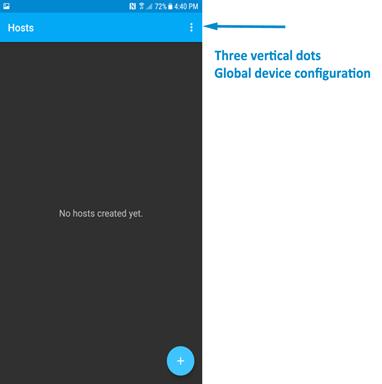
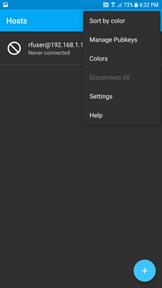
The 3 vertical dots allow access to the ADDITIONAL global GSW Connect Bot configuration settings.
|
Figure 26: Menu to access Global configuration
|
Figure 27: Accessing Settings
|
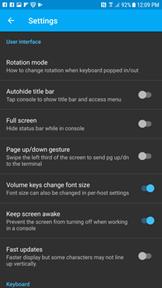
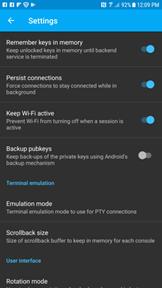
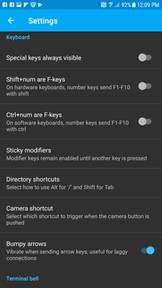
Additional settings are accessed by tapping the three vertical dots in the upper right hand corner of the app and selecting “Settings”.
The available settings are shown in the screen shots below.
Most of these options are self-explanatory.
|
Figure 28: Settings
|
Figure 29: Settings 2
|
Figure 30: Settings 3
|
Answerback allows the mobile client to pass a text string (up to 20 characters) to the SSH/Telnet server when connecting.
The AnswerBack string is set in the GSW ConnectBot Host connection configuration.
This is the only configuration required on the client.

Figure 31: Answerback Setting
An enhanced method of obtaining the Answerback is available when using the GSW SSH/Telnet Server (UTS). The application running on the GSW UTS accesses the answerback value using the server side environment variable gwtn_answerback.
This does not use any screen locations and the display is not impacted as with many AnswerBack solutions. An environment variable is much easier to read than a screen location.
Following is an example of how to configure the GSW UTS to obtain the AnswerBack from the GSW ConnectBot.
The Server side configuration consists of a lightweight utility (answerback utility) and logon scripting (example below). When the GSW ConnectBot connects to the UTS, the logon script is executed and the answerback utility obtains the Answerback string from the GSW ConnectBot. It then inserts it in the environment variable gwtn_answerback for the application to access.
From the GSW UTS SSH/Telnet Server. –
1. Download and copy the gs_enq.exe, gs_enq64.exe files to a folder that the logon scripts can access. To download these utilities Click Here.
2. Set the user’s home directory to point to a folder where they can write a temporary file.
3. Edit the users Logon Script (c_start.bat or k_start.bat) and add the lines to retrieve the Answerback.
Modify the Logon script of the User to the following, making sure to change any environmental variables to match the User connection being queried. In this example, we are querying for the Answerback of RFUser.
::========== Start of Logon Script=========
@echo off
set gwtn_color=1
set gwtn_graphics=1
set gwtn_term=1
set gwtn_home_dir=C:\GS_UTS\scripts\LocalUsers\RFuser
@if %gwtn_gsclnt%==1 goto :GSW
@set GWTN_ANSWERBACK=%GWTN_CLIENT_IP%
@c:\gs_uts\gs_enq.exe
@if errorlevel 1 goto :NOANSWERBACK
@set /P GWTN_ANSWERBACK=<ab%gwtn_agntpid%.txt
@del ab%gwtn_agntpid%.txt
@:NOANSWERBACK
@:GSW
<Launch your Application here, using GWTN_ANSWERBACK as a variable>
Example:
C:\hjs\adv\bin\telterm.exe 10.200.150.8 4700 %gwtn_answerback%
:: ============ Answerback stored in GWTN_ANSWERBACK.=========
Connect the user to the server using GSW ConnectBot. The Answerback in the GSW ConnectBot configuration should be returned within the connection shell.
Note:
On x64 systems gs_enq64.exe must be used instead of gs_enq.exe.
After this block is executed the variable GWTN_ANSWERBACK is going to be set.
Of course, c:\GS_UTS\ must be substituted with your own path.
Client Lockdown limits a user to the specific application. This prevents the Worker from modifying the connection or accessing other applications.
Installation of GSW ConnectBot results in creation of two user icons. There is an Administrator icon and a Worker icon.
The Icon with ‘W’ in the lower right hand corner (“Work” mode) is for companies using the client in restricted production and or screen lockout mode.
Using the icon without the ‘W” enters administrative mode. The intent is that the administrator will preconfigure hosts, public/private key etc.
The administrator will then use the Work mode icon and pin the app.
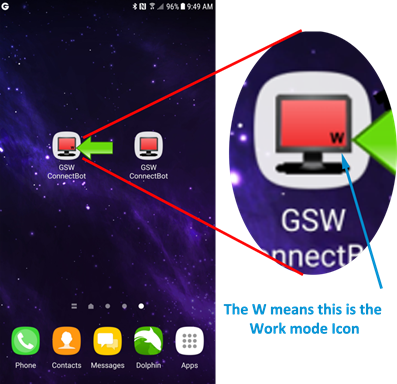
Figure 32: Two Modes of Connection
You can limit a worker to the GSW ConnectBot by using Android screen pinning. The process varies slightly with different versions and devices.
To Pin (lockdown) GSW ConnectBot app, perform the following steps configuration:
Performed by administrator
· Create Hosts
· Enable “Pin Window”
· Enable “Ask for Pin before Unpinning”
· Pin the App
This is described in the section Create new Host Connection Configuration
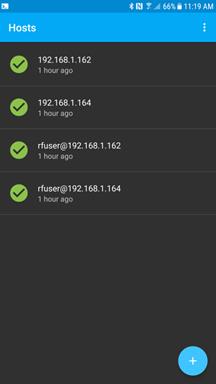
Figure 33: Create Host(s)
Enable Pin Window allows the application to be “pinned” such that that it is the only application available to the Worker.
To enable Pin Window you navigate to Settings->Lock screen and security->other security settings
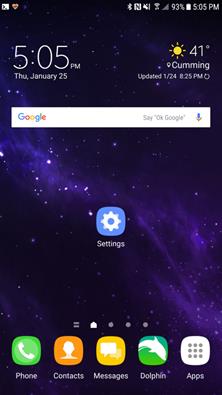
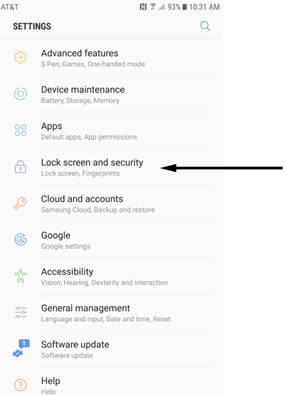
From your Android home screen, tap “Settings”. On our device, the home screen and settings looks as shown in Error! Reference source not found.34.
The settings screen opens as shown on the right in Error! Reference source not found.35.
|
Figure 34: Settings Icon on Home Screen
|
Figure 35: Tap Lock screen and security
|
Tap on “Lock screen and security”. The name of this setting may vary between Android devices.
The Lock Screen and Security screen contains “Other security settings”
Tap “Other security settings”
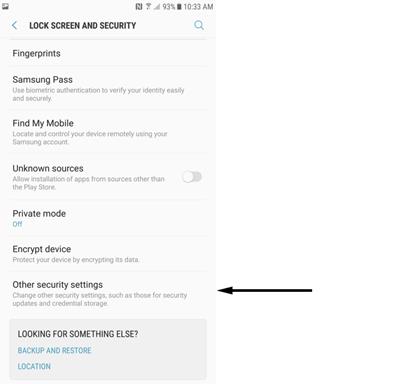
Figure 36: Other Security Settings
The Other Security Settings screen contains the “Pin Windows” configuration item.
In “Pin Windows” field, tap the switch icon to turn this feature on.
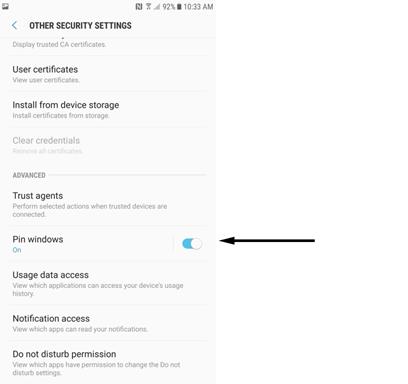
Figure 37: Pin Windows
The Pin windows option is now enabled.
Tap on the Pin windows field to display the “Ask for Pin before unpinning” option.
Enabling “Asking for the Pin” requires the PIN for the device be entered to exit the application. If you don’t enable “Ask for Pin before unpinning”, the worker can exit the application simply by pressing common key sequences.
Select “Ask for PIN before unpinning”.
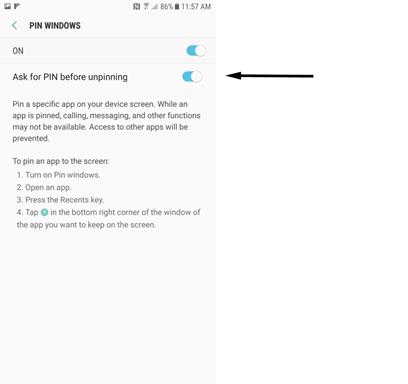
Figure 38: Enable Ask for PIN before unpinning
Now Exit Settings
The last step is to Pin the screen.
With GSW ConnectBot, Android Work App open, press the “Recents” button on your home screen.
Tap the “Pin” Icon in the bottom right corner of the GSW ConnectBot App Card.
Note: You may have to move the window up before the pin in the bottom right corner becomes visible.
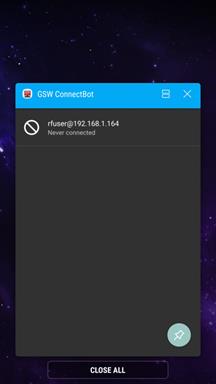
Figure 39: Pinning/Unpinning an App, 7.0
To Unpin an App, press both the “Back” and “Recent” buttons simultaneously.
Enter PIN to complete unpinning.
Navigate to the Settings menu on your phone.
Scroll until you see the Security section and tap on that.

Figure 40: Security
In the Security menu, scroll to the bottom where you will find “Pin windows” and tap it.

Figure 41: Pin Windows
1. Enable screen pinning by tapping the toggle at the top right of the menu.

Figure 42: Toggle on Pinning
If you have any type of lock screen security (PIN, pattern, etc), you can have it
displayed in order to unpin the app by toggling that option.

Figure 43: Lock Screen Security
With GSW ConnectBot, Android Work App open, press the “Recent” button on your home screen.
Tap the “Pin” Icon in the bottom right corner of the GSW ConnectBot App Card.
Note: You may have to move the window up before the pint in the bottom right corner becomes visible.

Figure 44: Pinning/Unpinning an App 6.0
To Unpin an App, press the “Back” and “Recent” buttons simultaneously.
Enter PIN to complete unpinning.
To maintain security of the device, only the Administrator should have the PIN, otherwise the end user would have full access to the device and file system.
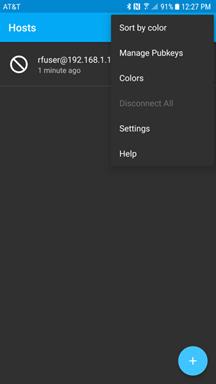
Error! Reference source not found.45 shows the GSW ConnectBot screen in Administrator Mode.
Notice the full menu options available.
|
Figure 45: Administrator Mode
|
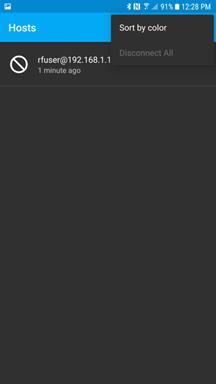
Figure 46: Work Mode
|
Error! Reference source not found.46 shows the GSW ConnectBot screen in Work mode.
Notice the menu is restricted to “Sort by color”.
No administrative functions are enabled in Work Mode.
GSW ConnectBot is the most secure SSH Client available for Android.
The GSW ConnectBot is using the current SSH algorithms recognized as secure to ensure you have the best protection available. Algorithms that are not deemed safe are not used.
Below we are going to show you how to configure the GSW ConnectBot client to make SSH connections using Password Authentication.
Open GSW ConnectBot App on your Android device.
Tap the blue plus sign button in the lower right corner to start a new host configuration.
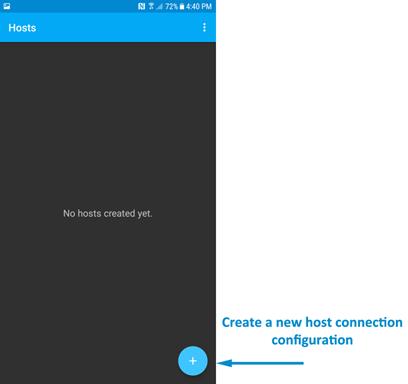
Figure 47: Creating a Host
A new Host Connection Configuration screen is displayed.
SSH is the default protocol, so do not change. We need to specify the username@hostname. When the text field is tapped, the soft keyboard opens.
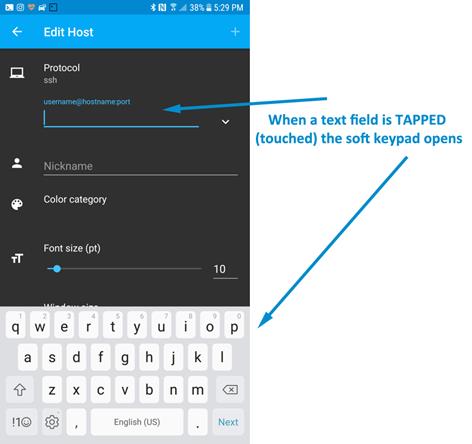
Figure 48: Tap text field and soft keyboard opens
|
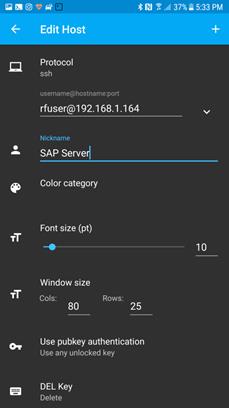
Configure these options to get a working connection: 1. Enter <user>@<IP address> and 2. Choose a nickname: SAP Server as shown below. 3. Tap “Use pubkey authentication”. Select “Do not use keys”.
· You may also want to modify other items if necessary –
· Select the Color of the text used on this Host Connection when displayed on the Hosts screen.
· The Font size does not need to be set unless the column and rows of the Window Size are set to zero.
· Adjust Window size to match your server’s settings.
· It is good to confirm: o “Start shell session” is on. o “Stay connected” is on, to keep trying to reconnect if disconnected. o Choose whether to close the session on disconnect.
|
Figure 49: Enter username, nickname, etc.
|
||
|
|
|
|
Tap the plus sign “+” in the upper right to save the connection.
Tap on the connection to connect to your Georgia Softworks Universal Terminal Server.
Public/Private keys are an extremely secure and convenient method of logging on to the host. The following are instructions on setting up an SSH key pair for GSW ConnectBot
This example is the same as Example 1, with some configurations difference.
Here are the modified items for the SSH Public/Private Key Authentication.
You can configure these options to get a working connection.
1. Enter <user>@<IP address> and
2. Enter the nickname SAP Server as shown below.
3. Tap “Use pubkey authentication”. Select “Use any unlocked keys”.
4. Enable Use SSH auth agent
In this case, leave “Use pubkey authentication” set to the default which is “Use pubkey authentication”.
Tap the “plus sign” in the upper right corner to save the
connection.
Figure 50: Saving the Connection
Configuring a public/private key pair consist of the following steps.
· Enter the configurable parameters for the Public/Private Keys
· Generate (using randomness)
· Unlock the Key
· Transfer the public key to the SSH server
· Install the public key on the SSH Server
To enter the public key parameters , navigate to Manage Public Keys screen.
To navigate to the Manage Public Keys screen, tap on the three vertical dots in the upper right hand corner and the Hosts Menu appears.
|
Figure 51: Host screen for Key generation
|
Figure 52: Manage Pubkeys menu item
|
The first time a key is added, the Generate screen opens. If you already have key(s) on the device then the Pubkeys screen (ex: Error! Reference source not found.) will open with a list of available keys. If keys are present, tap on the “+” plus sign to add a new key.
The Generate screen allows you to enter the key parameters such key type, number of bits, etc
· Enter a nickname for the key pair.
· Select the type of key you would like to generate. RSA is the default.
· Select the encryption strength. Anything less than 2048 is not recommended.
· Enter a password for you key pair [optional]
· Check Load key on start.
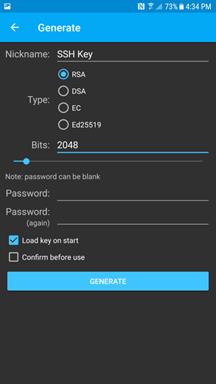
Figure 53: Create SSH Key Pair
|
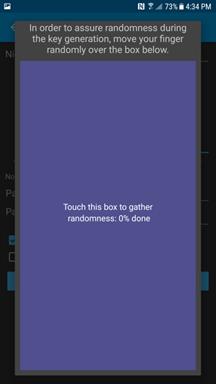
Figure 54: Generate Randomness for Keys
|
Figure 55: Generate Randomness until 100%
|
As shown in Error! Reference source not found., as you move your finger on the field, the percentage of randomness increases. Once randomness reaches 100%, the key pair is created
The Pubkeys screen is opened as shown below:
Tap the key to unlock it. This makes it available for connections to use.
. 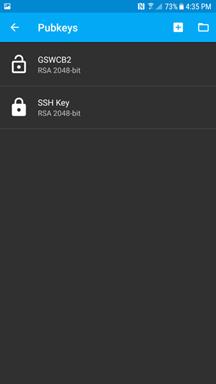
Figure 56: Unlocking a Key Pair
Transferring the Key to the SSH server is easy using common techniques.
On the PubKeys screen:
1. Press and hold the key to access the options menu.
2. Select “Load key on start” (if it is not checked)
3. Tap “Copy public key”. This will copy the public key to your device’s clipboard.
4. Open an e-mail client on your device, create an e-mail and paste the public key into the mail.
5. E-mail the key to an account that you have access to from your Georgia SoftWorks Universal Terminal Server.
Now, we will configure the Host (public) key on the GSW server.
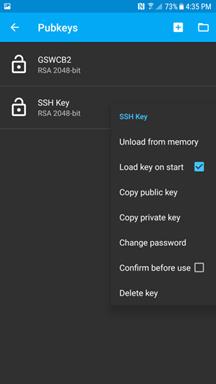
Figure 57: Copy Public Key
On the Georgia Softworks UTS server, go to Start > All Programs > Georgia Softworks UTS > Certificate Mapping Tool for GSW SSH Shield.
1. Copy the public key from the e-mail that you sent in the previous step.
2. Expand Public Key Mapping, and select 1-to-1. Next click Add.
3. Click Enable this mapping and paste the clip board data into the Public key area. Fill out the rest of the fields below.
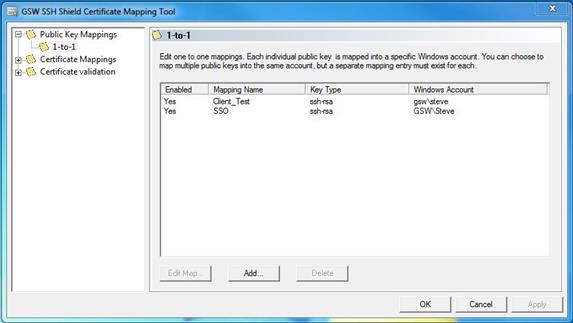
Figure 58: Certificate Mapping Tool
4. Click “Enable this mapping” and paste the public key you created using GSW ConnectBot into the Public key area. Fill out the rest of the fields.
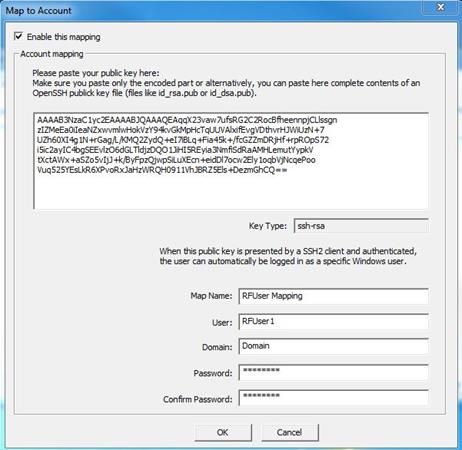
Figure 59: Installing Public Key
5. Click OK, and click Apply. You should now see the mapping you created.
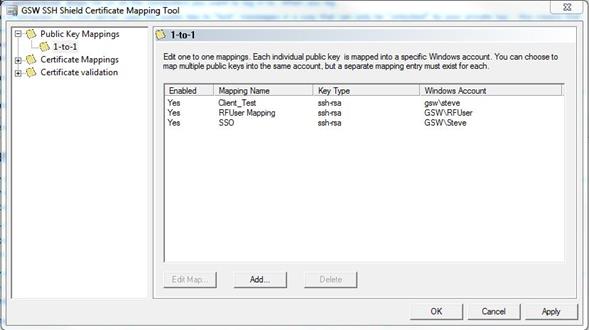
Figure 60: Key Installed
6. The changes
will not take effect until the Georgia SoftWorks SSH
Shield service is restarted. Click YES to restart SSH (all current
connections will be dropped) or NO if you intend to restart later.
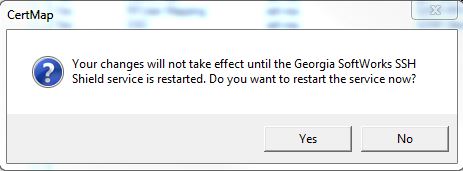
Figure 61: Restart SSH Service
Once the UTS server has restarted, you may test the GSW ConnectBot SSH connection.
Below we are going to show you how to configure the GSW ConnectBot client to make Telnet connections using Password Authentication.
Open GSW ConnectBot App on your Android device.
Tap the blue plus sign button in the lower right corner to start a new host configuration.

Figure 62: Creating a Host
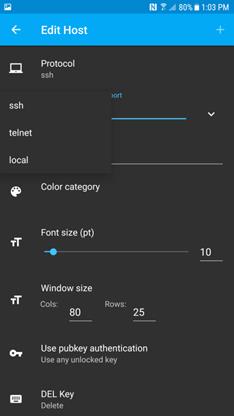
A new Host Connection Configuration screen is displayed (see below).
SSH is the default protocol, Tap protocol and select Telnet.
|
Figure 63: Defining a Telnet Host
|
|
|
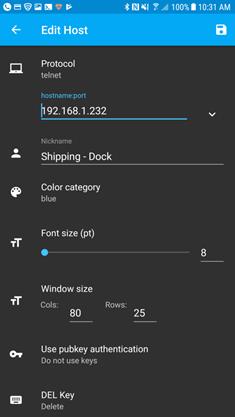
Configure these options to get a working connection. 1. Tap the down arrow next to the “hostname:port” field Enter 192.168.1.232 If you are using an alternate port for Telnet, you specify it here (ex: 192.168.1.232:567) Otherwise leave it as the default Telnet port, 23. 2. Choose a nickname: Shipping Dock.
You may also want to modify other items if necessary –
Select the Color of the text used on this Host Connection when displayed on the Hosts screen.
The Font size does not need to be set unless the column and rows of the Window Size are set to zero.
Adjust Window size to match your server’s settings.
Telnet will not use public/private keys. The “Use pubkey authentication” field may be ignored. Tap the DEL Key to specify the key use to send a “delete” message. Choices are “Delete” and “Backspace”.
|
Figure 64: Enter Username, Nickname, etc.
|
|
|
Continued on next page |
|
|
Choose your encoding, UTF8 is the default.
You may ignore “Use SSH auth agent”, as this is a Telnet connection.
Compression not used with Telnet.
Make sure “Start shell session” is on.
Make sure “Stay connected” is on, to keep trying to reconnect, if disconnected
Choose whether to close the session on disconnect.
Enter any Post-login commands as required, commands in user’s logon script is a better option.
|
Figure 65: Connection Settings
|
Figure 66: Saving the Connection
|
Enter an Answerback if required by your application.
Additional settings can be found by tapping the three vertical dots in the upper right hand corner of the app and selecting “Settings”.
|
Figure 67: Accessing Settings
|
Figure 68: Settings 1
|
|
Figure 69: Settings 2
|
Figure 70: Settings 3
|
Tap the plus sign “+” in the upper right to save the connection.
Tap on the connection to connect to your Georgia Softworks Universal Terminal Server
When you have a question, please not hesitate to contact using the preferred support method – the GSW Support Ticket system.
Georgia SoftWorks ticket system (http://www.georgiasoftworks.com/support_ost/index.php)
You may also want to visit our forums, they are monitored by our technical support team.
Visit the GSW Forums
If you are unable to use our ticket system or forums, below is out telephone number.
Call +1 706.265.1018 . EST, M-F 9:00 a.m. to 5:00 p.m. and have your Product ID ready